
How to Clean a Water Dispenser Properly (Step-by-Step Guide)
A clean water dispenser is essential for ensuring safe, fresh, and great-tasting drinking water every day. While many people rely on their water dispenser for convenience, regular cleaning is often overlooked. Dust, bacteria, mold, and mineral deposits can accumulate over time, affecting both the quality of the water and the performance of the appliance. Learning how to clean a water dispenser correctly helps maintain hygiene, extends the life of the unit, and keeps your family or employees healthy.
Whether you use a dispenser at home or in the workplace, following a proper cleaning routine is important. This comprehensive guide explains how to clean a water dispenser step by step, along with useful water dispenser maintenance tips to keep your appliance in excellent condition.
Why Regular Water Dispenser Cleaning Is Important
A water dispenser stores and dispenses drinking water, making cleanliness a top priority. If left uncleaned for long periods, harmful microorganisms and mineral buildup can develop inside the dispenser.
Regular cleaning helps:
- Prevent bacteria and mold growth
- Improve the taste and smell of drinking water
- Increase the lifespan of your water dispenser
- Maintain efficient cooling and heating performance
- Ensure hygienic drinking water for your family or staff
Following a proper water dispenser cleaning guide every few weeks significantly reduces health risks and keeps the appliance functioning smoothly.
How Often Should You Clean a Water Dispenser?
Experts recommend cleaning your water dispenser every 4 to 6 weeks under normal household use. If the dispenser is installed in a busy office or commercial environment, cleaning every 2 to 4 weeks is ideal.
You should also clean it:
- Whenever changing the water bottle
- After a long period of non-use
- If the water develops an unusual taste or odor
- If visible dirt or deposits appear inside the dispenser
Knowing how to clean a water dispenser regularly ensures that every glass of water remains safe and refreshing.
Items You’ll Need
Before starting, gather the following supplies:
- White vinegar or food-grade disinfectant
- Mild dish soap
- Warm water
- Soft microfiber cloth
- Sponge
- Small cleaning brush or bottle brush
- Clean bucket
- Disposable gloves (optional)
Avoid using harsh chemicals or abrasive scrubbers that may damage the dispenser.
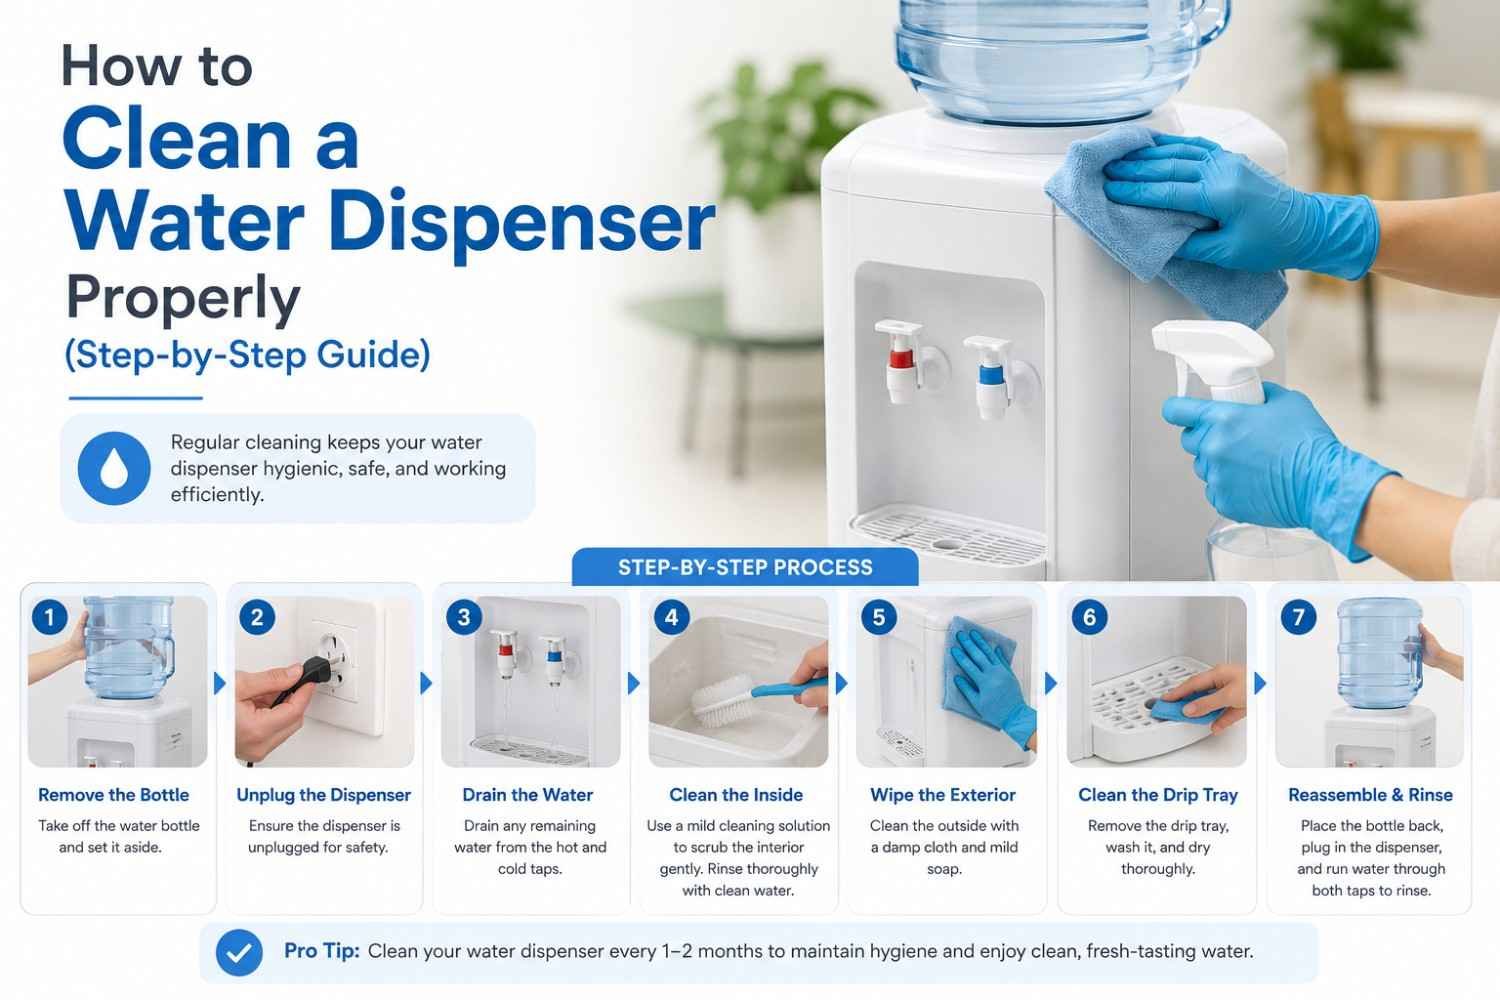
Step 1: Turn Off and Unplug the Water Dispenser
Safety always comes first.
- Switch off the dispenser.
- Unplug it from the electrical outlet.
- Remove the water bottle carefully.
- Drain any remaining water from both hot and cold taps.
This prepares the appliance for safe cleaning.
Step 2: Remove Detachable Parts
Take apart all removable components, including:
- Drip tray
- Water guard
- Faucet covers (if removable)
- Bottle support ring
Wash these parts separately using warm water and mild soap.
Step 3: Clean the Interior Reservoir
The most important step in how to clean a water dispenser is cleaning the internal reservoir.
Prepare a cleaning solution using:
- White vinegar and water (1:3 ratio)
OR
- A manufacturer-approved cleaning solution.
Pour the solution into the reservoir and allow it to sit for approximately 10–15 minutes.
This loosens mineral deposits and helps remove bacteria.
Step 4: How to Sanitize a Water Dispenser
After cleaning comes sanitization.
Learning how to sanitize a water dispenser is essential for eliminating germs that ordinary washing cannot remove.
Use a food-safe sanitizing solution or diluted vinegar mixture and gently wipe all accessible internal surfaces.
Allow the sanitizer to remain inside for several minutes before draining completely.
This process effectively removes bacteria while keeping drinking water safe.
Step 5: Scrub Hard-to-Reach Areas
Use a soft bottle brush to clean:
- Water reservoir corners
- Faucet openings
- Internal surfaces
- Water bottle connection area
Never use metal brushes, as they may scratch the plastic.
This step is an important part of any professional water dispenser cleaning guide.
Step 6: Rinse Thoroughly
Flush the reservoir several times using clean drinking water until no cleaning solution remains.
Run water through both hot and cold taps to ensure every internal passage is completely clean.
Proper rinsing prevents any cleaning residue from affecting the taste of your drinking water.
Step 7: Clean the Exterior
Use a soft, damp cloth with mild soap to wipe:
- Front panel
- Side panels
- Control buttons
- Handles
- Water taps
Keeping the exterior clean improves hygiene and enhances the appearance of the appliance.
Step 8: Reassemble and Install a Fresh Water Bottle
Once every component has dried completely:
- Reinstall all removable parts.
- Place a fresh water bottle on the dispenser.
- Plug the unit back in.
- Allow it to cool or heat the water before use.
Your dispenser is now ready to provide fresh, clean drinking water.
How to Disinfect a Water Dispenser Safely
Many people ask how to disinfect a water dispenser without using harsh chemicals.
The safest methods include:
- Food-grade sanitising solutions
- White vinegar
- Manufacturer-recommended disinfectants
Avoid bleach unless specifically recommended by the manufacturer, as improper use may leave harmful residues.
Water Dispenser Maintenance Tips
Regular maintenance reduces the need for deep cleaning and improves overall performance.
Here are some essential water dispenser maintenance tips:
- Clean the dispenser every month.
- Replace water bottles carefully to avoid contamination.
- Wipe the taps daily.
- Empty the drip tray regularly.
- Store water bottles in a cool, clean place.
- Keep the dispenser away from direct sunlight.
- Inspect for leaks or unusual noises.
- Schedule professional servicing if required.
These simple habits help your dispenser last much longer.
Clean Water Dispenser at Home: Best Practices
If you’re trying to clean water dispenser at home, remember these simple rules:
- Wash your hands before replacing water bottles.
- Use clean cloths during maintenance.
- Never leave standing water inside the reservoir.
- Dry all removable parts before reassembling.
- Follow the manufacturer’s cleaning recommendations.
A little maintenance each month can prevent expensive repairs later.
Common Mistakes to Avoid
Many users unknowingly damage their water dispenser by making these mistakes:
- Skipping regular cleaning schedules
- Using abrasive cleaning materials
- Forgetting to rinse after sanitizing
- Ignoring mold around the water bottle neck
- Using strong chemical cleaners
Avoiding these errors keeps your water dispenser hygienic and functioning efficiently.
When Should You Replace Your Water Dispenser?
Cleaning can solve many issues, but replacement may be necessary if:
- The dispenser develops persistent leaks.
- Cooling or heating stops working.
- Plastic components become cracked.
- The appliance emits unusual odors despite cleaning.
- Frequent repairs become expensive.
If you’re planning to upgrade your unit, trusted Water Dispenser Dealers in Rohini can help you choose models that are easier to maintain and offer better energy efficiency. Similarly, reliable Water Dispenser Dealers in Ashok Vihar provide a wide selection of modern dispensers suitable for homes, offices, schools, and commercial spaces.
Conclusion
Understanding how to clean a water dispenser is essential for maintaining safe drinking water and extending the life of your appliance. Regular cleaning, proper sanitization, and routine maintenance help prevent bacteria buildup while ensuring your dispenser continues to perform efficiently.
By following this complete water dispenser cleaning guide, learning how to sanitize a water dispenser, practicing effective water dispenser maintenance tips, knowing how to disinfect a water dispenser, and taking the right steps to clean water dispenser at home, you can enjoy fresh, hygienic water every day with confidence.


Leave a Reply